Recessed Lighting Repair in Los Angeles: What’s a Simple Fix and What Isn’t
Updated September 2026
A recessed light that flickers, won’t turn on, or trips its breaker repeatedly is usually trying to tell you something more specific than “the bulb is bad.” RG Electric is a licensed C10 electrical contractor in Los Angeles, License #910807, and recessed lighting repair is one of the more common calls we get, precisely because the failure looks simple from underneath the ceiling and often isn’t. Some causes really are a two-minute fix. Others are a symptom of something happening inside the ceiling that a bulb swap will never solve.
Why Recessed Lighting Fails More Often in Older Los Angeles Homes
Los Angeles has a lot of homes built well before recessed lighting was standard, and a lot of those fixtures were added later, during a remodel, by whoever was doing the work at the time. That history matters. A recessed light installed in the 1990s into a 1960s ceiling doesn’t always meet the clearance, insulation, and wiring standards a fixture installed today would be held to, and the older the retrofit, the more likely it is that something about the original installation is the actual source of the problem, not the fixture itself. That gap between when a fixture was actually installed and what current standards expect is where most of the less obvious failures described below actually originate.
This is why the same symptom, a light that won’t turn on, can mean completely different things in a home in Sherman Oaks built in 1962 versus a unit in a newer Koreatown building. Diagnosing it correctly means knowing what era of construction you’re dealing with before you start guessing at causes.
The Genuinely Simple Fixes Worth Checking First
A few causes really are as simple as they sound, and it’s worth ruling them out before assuming the problem is bigger than it is. The most common is a bulb that’s simply failed, which you can usually confirm by swapping in a bulb you know works from another fixture. The second most common is a bulb with the wrong wattage for the housing. Recessed housings are rated for a maximum wattage, and a bulb that exceeds it causes the fixture to overheat, which triggers an internal thermal cutoff long before anything is actually damaged. Checking the wattage rating printed inside the housing against the bulb installed takes less time than diagnosing anything else on this list.
If the fixture uses an LED retrofit module rather than a screw-in bulb, dimmer incompatibility is also worth ruling out. Not every dimmer is rated for LED loads, and the wrong pairing produces flickering or a light that won’t dim below a certain level, which can look like a fixture failure when it’s actually a mismatched control.
When the Trim Is Sagging or Won’t Sit Flush
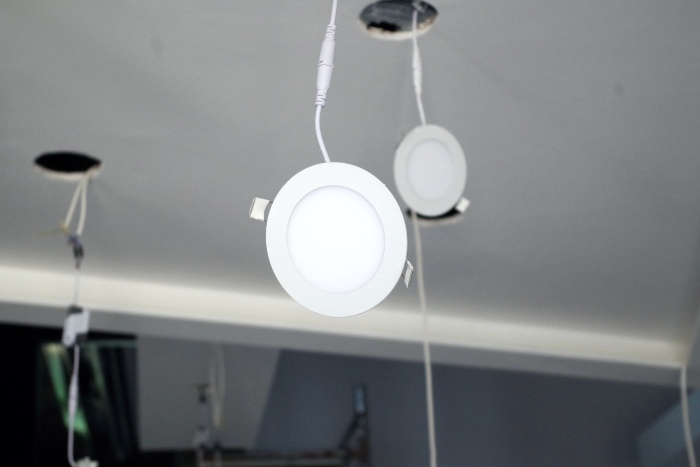
Recessed trims are held in place by spring clips tensioned against the inside of the housing. Over years of heat cycling, those springs lose tension, and the trim starts to sit unevenly or drop slightly out of the ceiling. This is a real and common issue, and on its own it’s cosmetic rather than dangerous. But a trim that’s fallen out of position can also expose wiring connections inside the housing that were never meant to be accessible, which turns a cosmetic problem into a safety one. If a trim has come loose enough that you can see into the housing itself, that’s worth having looked at rather than just pushed back into place.
When the Light Won’t Turn On At All
A fixture that stays dark even with a known-good bulb installed points to the socket or the wiring feeding it, not the bulb. A damaged socket, a loose wire nut inside the housing, or a connection that’s backed out over time from repeated heat expansion and contraction are all common in older installations, especially ones that were never opened up and inspected after the original install.
This is also where a pattern matters more than a single fixture. If one recessed light in a run has gone dark, it’s usually isolated to that fixture. If several lights on the same switch have gone out together, or a bulb blows repeatedly within days of replacement, that’s a sign of a wiring issue upstream of the fixture itself, not a fixture problem repeating six times in a row by coincidence. Opening a live housing to check a connection is exactly the kind of work that should go to a licensed electrician rather than be diagnosed by touch.
The Insulation Problem Specific to Older LA Construction
This is the failure mode that’s most specific to older Los Angeles retrofits, and it’s the one a generic troubleshooting checklist tends to miss entirely. Modern recessed housings are rated IC, meaning insulation contact, and are built to run safely with insulation packed directly against them. Older housings, and housings installed before energy codes required attic insulation upgrades, are frequently non-IC rated, meaning they need clear air space around them to avoid overheating.
The problem shows up when a home gets an attic insulation upgrade, common across Los Angeles as an energy-efficiency improvement, and the insulation contractor packs material against fixtures that were never rated for it. The recessed light itself hasn’t changed. The environment around it has. The fixture overheats, its thermal protection trips repeatedly, and from inside the house it just looks like a light that won’t stay on. The actual fix isn’t a new bulb, it’s confirming the housing’s IC rating and correcting the clearance, which is not something visible from below the ceiling.
Why a Simple Repair Sometimes Uncovers a Bigger One
Once a housing is opened to diagnose a socket or wiring issue, it’s not unusual to find something else nearby that was never part of the original complaint, a splice that was never put in a junction box, a connection shared with a circuit it shouldn’t be sharing, or wiring that shows heat damage from a problem that’s been developing for longer than the current symptom suggests. In an older Los Angeles home where the recessed lighting was added well after original construction, this is common enough that it shouldn’t come as a surprise when it happens.
This is also why a repair that seemed like it should take twenty minutes can turn into a longer conversation about what else needs correcting. It’s not upselling. It’s the same reason a panel replacement sometimes surfaces conditions in circuits nobody asked to have looked at, once someone with the right training is actually inside the system.
What a Recessed Lighting Repair Visit Typically Involves
A diagnostic fee covers the technician’s time to identify what’s actually wrong before any repair work begins, the same as any other service call. Once the cause is confirmed, whether that’s a socket, a wiring connection, or an insulation clearance issue, we explain what we found and what fixing it involves before doing the work, not after. There are no surprise line items added once the ceiling is already open.
If a home has several recessed lights failing on the same run, it’s usually more efficient to look at the whole run in one visit rather than schedule separate calls as each fixture fails on its own timeline. A technician checking one housing for a wiring issue is already positioned to check the adjacent ones, and catching a shared problem early is almost always cheaper than fixing the same issue fixture by fixture over several months.
When Repair Isn’t the Right Call Anymore
Not every recessed lighting problem is worth repairing in place. A housing that’s genuinely the wrong rating for its environment, non-IC rated and buried in insulation, is better replaced with a correctly rated fixture than repeatedly serviced for the same overheating symptom. Similarly, if a run of six recessed lights installed at the same time is starting to fail one by one over a period of months, that’s usually a sign the whole run was wired or installed the same way, and the fixtures still working today are on the same timeline as the ones that have already failed.
In both cases, repairing each fixture as it fails costs more over time than addressing the pattern directly. We’ll always tell you honestly which situation you’re in rather than defaulting to whichever option costs more. For homes where most of the recessed lighting was installed at the same time, treating the run as a single system rather than a collection of individual fixtures is usually the more accurate way to think about both the diagnosis and the eventual cost.
Frequently Asked Questions
How do I know if my recessed lighting is IC rated?
The rating is printed on a label inside the housing itself, which usually means removing the trim and bulb to see it. If your attic has been insulated since the fixtures were installed and you’ve never confirmed the rating, that’s worth checking before assuming a recurring failure is a bulb problem.
Can multiple recessed lights be diagnosed and fixed in one visit?
Yes, and if more than one fixture in the same area is having problems, we’d recommend looking at all of them together rather than scheduling separate visits as each one fails.
Do I need a permit to replace a recessed light housing?
Replacing a housing on an existing circuit typically doesn’t require a permit. Adding new circuits or fixtures, or work tied to a larger renovation, usually does. We’ll tell you which situation applies during the visit.
Is it safe to keep replacing the bulb if a recessed light keeps going out?
If a bulb has failed more than once in the same fixture within a short period, that’s a sign the problem isn’t the bulb. Continuing to replace it without checking the socket or wiring risks masking a connection issue that should be looked at directly.
LED Retrofits in Older Recessed Housings
A lot of the recessed lighting we service in Los Angeles started as incandescent or halogen fixtures and has since been converted to LED, either with a screw-in LED bulb or a retrofit module that clips into the existing housing. That conversion is usually a good move for energy use and bulb life, but it introduces a failure mode the original fixture never had: dimmer and driver compatibility.
Older dimmers were designed for the higher, steadier current draw of incandescent bulbs. LED drivers pull current differently, and a dimmer that was never rated for LED loads can produce flickering, a buzzing sound from the fixture, or a light that won’t dim below a certain point no matter where the slider sits. This looks and sounds like a failing fixture, but the fixture itself is usually fine. The dimmer is the mismatch. We check dimmer compatibility as a standard part of diagnosing any LED recessed lighting complaint, since replacing a bulb or module that was never the actual problem doesn’t fix anything.
The other common issue with LED retrofit modules is heat management inside housings that were designed decades before LED existed. Even though LEDs run cooler than incandescent bulbs at the light source, a retrofit module packed into a tight, poorly ventilated older housing can still build up enough heat to trigger thermal protection repeatedly, particularly in housings that are also dealing with the insulation clearance issue described above. Two problems compounding each other is common enough in older LA retrofits that we check for both rather than stopping once we’ve found one.
Why does a recessed light repair sometimes cost more than expected?
The cost difference usually comes down to what’s actually causing the failure in the first place. A bulb or socket swap is quick and inexpensive. A wiring connection that needs to be traced, or an insulation clearance issue that requires accessing the housing from the attic side, takes more time and sometimes more material. We give a clear estimate once the cause is confirmed, before any repair work begins, so there’s no guessing involved on either side.
How RG Electric Handles Recessed Lighting Repairs
When we’re called out for a recessed lighting issue, we start by confirming what’s actually failing, the bulb, the socket, the housing, or the wiring feeding it, rather than assuming a fixture-level fix will solve a wiring-level problem. If the housing itself is non-IC rated and insulation has been packed against it, we’ll tell you that directly rather than replacing a bulb that was never the problem. If the diagnosis turns up something beyond the original fixture, a shared circuit, a splice outside a junction box, we explain what we found and what it means before doing anything about it. We stand behind the work with a 12-month workmanship guarantee, so if the same fixture fails again shortly after a repair, we come back without charging a second service call.
For homeowners dealing with multiple failing fixtures, or planning a broader lighting update, our indoor lighting installation services cover full fixture replacement and rewiring where a repair isn’t the right long-term answer for the space.
For immediate assistance or to schedule a professional evaluation, call RG Electric directly at (323) 521-5131.